


Taking screenshots helps in many ways. People take screenshots of much different stuff on their mobile devices. If you are using a mobile phone, taking a screenshot is as easy. But, when it comes to computers or PCs, many people still do not know how to do it.
Suppose you are using a Windows 10 PC. If you wish to take a screenshot on this device, several ways to do it. Screenshots on laptops and PCs work the same way on mobile phones. But, since the screen is more extensive, you can capture the entire display of the Windows PC.
Windows 10 offers many ways to take screenshots on them. It even has built-in screenshot tools for easy process. Besides that, you can also use other reliable third-party tools on your Windows 10 PC for screenshot purposes.
So, if you are looking at how to take a screenshot on Windows 10, we have listed the various processes right ahead.
Different techniques to take screenshots on Windows 10
Here are the various ways that you can apply to take screenshots on Chrome Windows 10.
- Use “Shift + Windows + S” Keys and Snip & Sketch.
- Use Snipping tool
- Use the “Print Screen” Key with the Clipboard
- Use the “Print Screen” Key with OneDrive
- Use the “Windows Game Bar.”
- Use the “Windows + Print Sc” shortcut keys.
So, let us now have a go at how these processes go.
Using the “Shift + Windows + S” Keys and Snip & Sketch.
One way to take screenshots on your Chrome Windows 10 is by hitting the “Shift + Windows + S” Keys on your keyboard. By doing so, you will get a ton of screenshot options. These include a full-screen shot, freehand screenshot, rectangular selection, and a separate program window.
- After taking a screenshot via the shortcut keys, you will receive a notification stating, “Snip Saved to Clipboard.”
- This thumbnail will get you to the “Snip and Sketch” window. This window will have every tool you need to take the perfect screen capture. It has a pen, pencil, eraser, cropping tools, ruler, etc.
- Capture the image and save it in your choice of the folder. You can also share the screenshot via the Windows Share menu or if the “Nearby Sharing” option is on.
This method is an alternative to the “Skip and Sketch” method. You can use this method by going to the Action Center and clicking on the “Screen Snip” button.
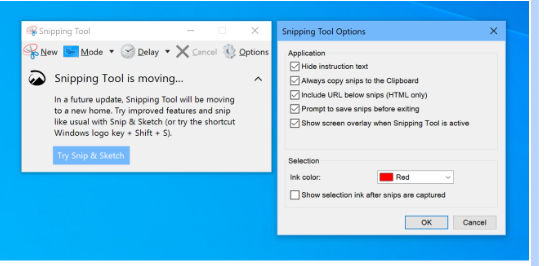
By using the Snipping tool.
Snipping Tool is a fantastic screenshot utility tool available on Windows 10. You can seamlessly take a screenshot of the desired image and save it directly as an image file on your device. So, here is how the process goes:
- Find the Snipping Tool on the Startup menu.
- Click on the “Mode” section and choose the type of shape that you want to capture the image in. These modes are free-form ship, rectangular snip, window snip, and full-screen snip.
- Then, click on the “New” section. This will freeze the screen for the screenshot.
- Take the screenshot by using the mouse. This will then show in the Snipping Tool window.
- You can also use different tools to alter your screenshot.
- After everything, click on the “Save As” option on the “File” tab.
Your screenshot is now saved on your device.
By using the “Print Screen” Key with the Clipboard.
This is the oldest trick to take screenshots on Windows PC. When you hit the “Print Sc” key on the keyboard, it captures the entire screen on display and is saved in the Clipboard. If you wish to keep the screenshot on a different app, it involves extra steps. In short, open the saved screenshot and simply copy-paste it to the desired location.
By using the “Print Screen” Key with OneDrive.
You can easily take a screenshot via the “Print Sc” key. But there is another way to use it.
- Go to the OneDrive Settings Panel > hover to the “backup” tab > choose “Automatically Save Screenshots/ Capture.”
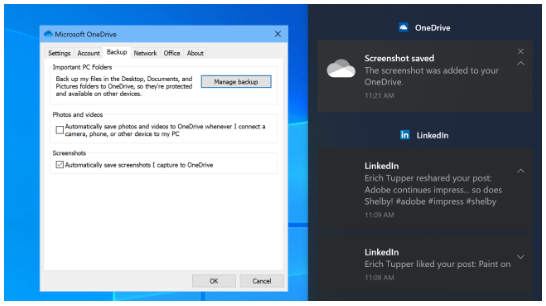
- Now, click on the “Print screen.” Your screenshot is directly saved in one step.
You will get a notification of where the screenshot is saved.
By using the “Windows + Print Sc” shortcut keys.
You can use this screenshot method on Windows 8. But, it works fine to take a screenshot on Chrome Windows 10. The screen capture will dim slightly when you hit the “Windows + Print Sc” shortcut keys. It will save the captured images in the Screenshots folder under Pictures as a PNG file.
By using the “Windows Game Bar.”
To open the Game Bar on your laptop, click the “Windows + G” shortcut keys. You can find it as a camera-like icon in the Broadcast and Capture section. When you tap on that icon, your screenshot will be saved in the primary user location. An interesting thing about this method is that you can also capture videos.
So, these are the different techniques to take a screenshot on Chrome Windows 10. You can also use other useful applications and tools to improve the process and outcome if necessary. We hope this guide is helpful to you.


Add Comment