


Screenshots on a Mac are a convenient feature. You can instantly capture anything on the device’s screen for future usage. Almost every device nowadays comes with this function. Whether you use an Android device, a PC, a computer, iPhone, or MacBook, all have the screenshot function.
Taking screenshots on Android devices seems easy most of the time. The technique is easy to learn, even for beginners. It is safe to say that iPhone also has a simple screenshot process. But the process seems a little harder regarding more giant screens like computers or laptops.
Every type of OS has its process for taking screenshots. Let’s say that you are using iOS devices. Also, iPhones, iPad, and Macs will likely have different and multiple ways to take screenshots.
So, if you are wondering how to take a screenshot on MacBook, you will find answers here. This guide focuses on several ways to take screenshots on MacBook.
As the MacBook versions are upgrading, the methods to take screenshots are also getting simpler. For a standard MacBook version, there are technically three simple ways. They are simply a combination of shortcut keys to take a screenshot. However, there comes a fourth method for MacBook Pro with Touch Bar.
You can save, open, and delete the screenshots for markup with various screenshot methods. And what’s exciting is that these methods apply to the latest MacBook versions with the new M2 chipset because the MacOS software and design are, more or less, the same as MacBook Air.
So, let’s go and take screenshots on Mac.
How to take a screenshot on a MacBook?
MacBooks running on macOS Catalina and Mojave come with a Screenshot App. The process to capture something on this version of Mac are simple. The methods below are also applicable to Apple Mac desktops.
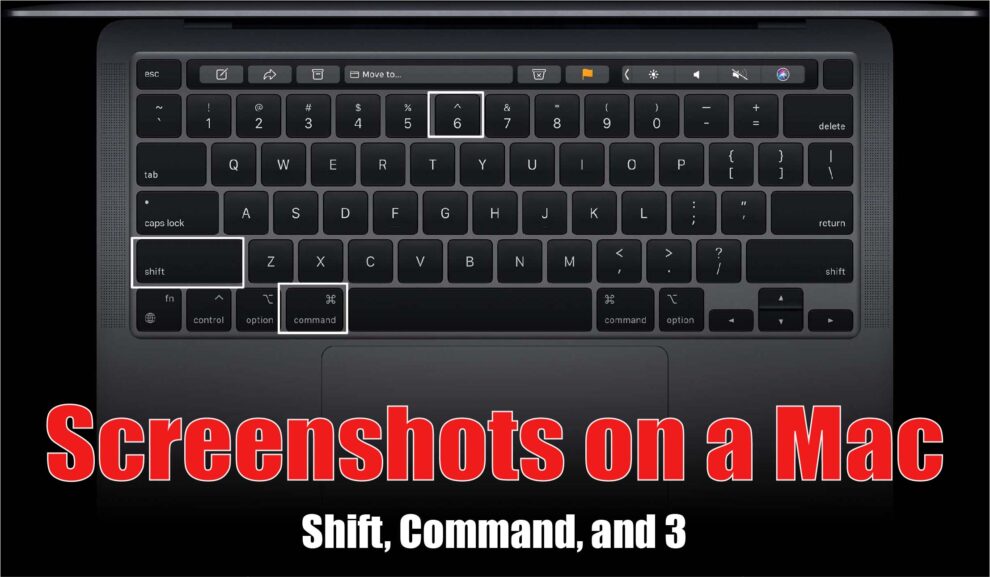
Method 1: Command + Shift + 3.
Pressing the “Command + Shift + 3” shortcut keys on the keyboard will capture the whole screen.
Method 2: Command + Shift + 4.
Pressing the “Command + Shift + 4” shortcut keys together will help you capture a particular window on the screen. Based on the steps, you can also easily take screenshots of a specific selection on the screen.
After you hit these shortcut combination keys, you have several options to go for:
- Hit the Spacebar – By doing so, your mouse or crosshair will serve as a camera. You can now drag the crosshair or mouse to the needed window you want to capture. The captured image will appear with a white border with tinges of shadow.
- Hold down the Spacebar – Keep pressing the Spacebar until you highlight the area you want to take a screenshot of. Release the button right before you release the mouse. That way, the needed shape and size of the image (selection) will be locked in and can also be repositioned. You can now have your perfect screenshot.
- Press down the Shift Key – The process here is the same as holding down on the Spacebar. The only difference is you can reposition the button edge of the highlighted area for a screenshot.
Method 3: Command + Shift + 5
We discussed a Screenshot App on MacBooks running on macOS, Mojave and Catalina. Pressing the “Command + Shift + 5” combination keys will open the Screenshot App on your Mac.
When the Screenshot App opens, you will see different icons. These icons, from left to right, denote the following:
- Entire screen capture.
- Specific window capture.
- Partial screen capture.
- Entire screen recording.
- Partial screen recording.
And if you look at the “Options” section on the right of the screen, you will find other features like timer, storage selection, cursor record option, etc. For saving the screenshot, there are multiple options like desktop, preview, mail, clipboard, and other locations. If you wish to record a specific window or screen, click on the video-recording buttons on the screen.
Also Read:- learn more about the features of your MacBook?
To close the screenshot capture panel, click the “X” button on the left of the screen. Or hitting the “Escape” key will also work.
The Screenshot App on MacBook has a default enabled Show Floating Thumbnail feature. After taking a screenshot, you can preview them in the bottom right corner of the screen. It has the disabled option, unlike that of iPhones.
Method 4: Command + Shift + 6
The combination keys for the screenshot on Mac, “Command + Shift + 6”, only apply to MacBooks with a Touch Bar. And we all know that Touch Bar is only available on the latest MacBook Pro.
Taking a screenshot on these MacBooks is easy. The options on the Touch Bar make the overall process very much straightforward.
So, these are the four basic ways to screenshot MacBooks. You can apply any method that seems easy to you. Now that we have discussed screenshots on Mac, why not look at the same process for an iPhone?
How to take a screenshot on an iPhone.
Taking screenshots on mobile phones is easy. There are not many complications to that. Even children are capable of taking a screenshot on Android phones and iPhones. Anyhow, the process of taking screenshots on an iPhone goes like these:
- Press down the Side button simultaneously along with the Volume-Up button. Press the Side button with the Home button for older iPhone models instead.
- As the screen or image is captured, you can see a preview or thumbnail of the same in the left corner at the bottom of the iPhone’s screen.
- Tap on the captured image or screenshot to make edits. You can also share or delete it in the right corner at the top of the screen.
- Click the “Done” button when you finish your editing or sharing. Apart from the default saving location, you can keep the screenshot to Files, Photos, etc.
We hope this guide helps you take a quick screenshot of your MacBook. Using the third method, you can delay the screenshot timings with the delay feature.


Add Comment