


It is not a big surprise that an iPhone camera is one of the best quality cameras available in the world. There would also be a video camera on the device, which they compare to professional-quality cameras.
An iPhone camera can serve as your editing machine to combine videos and clips perfectly. For instance, you can combine two different videos on your iPhone. You don’t need to transfer the first and second files to your computer to edit them together.
Though the process is reasonably straightforward, combining videos with built-in and third-party apps is easy. Today we shall talk about the process that follows when using different ways or sources to merge videos on an iPhone. But we shall mainly only focus on the third-party video editor, iMobie.
Merge videos on iPhone via iMobie.
If you are looking for a simple video editor app for your iPhone that can sync music and media between various devices like Skype, then iMovie is amongst those that can offer you that option. It allows you to combine music and media files and move them around on an iPhone using AirDrop or iCloud Drive.
The app can make professional-grade videos; I don’t consider that a drawback. This application is available for free for both iPhones and Macs. It is available for both iPhone and Mac users and can be used to combine videos too.
Here’s the process to combine videos on your iPhone via iMobie:
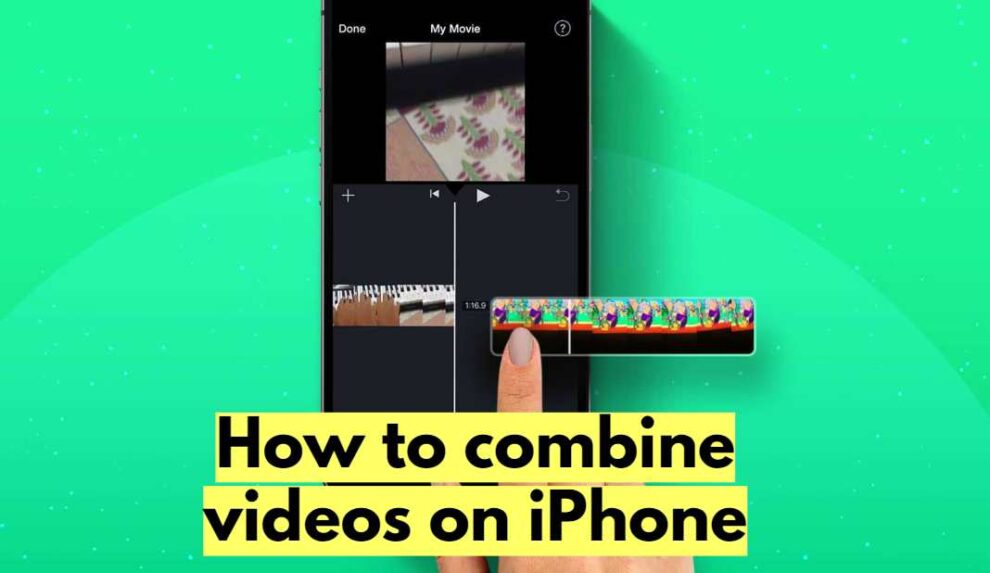
- Since you need access to the iMovie app on your iPhone, you will first want to get it from the App Store.
- Once you have the app installed, it is easy to get to the Create Project by launching iMovie and selecting the “Video” option on the top of the screen.
- From this screen, tap on “Create Project” and then select the movie type you wish to create, i.e., “Movie” or “Trailer.”
- Hit “Create” from the following screen.
- Now, tap the “Media” icon on the top of the timeline, and your video gallery will load up on your screen.
- Please select the desired source video to add it to the iMovie’s timeline.
- Follow the same process mentioned above to add your video to the timeline.
- The preferred video you can add to the timeline starts when the timeline reaches the left of the screen. The Left and right ads will be different.
- Alternatively, you can slow down the playhead movements by tapping the left or right of the timeline.
- Again, continue to add video and hover to the far end to construct a new one. This helps, especially for those who wish to space the video aesthetically.
- To preview the two videos in a play-back, there is the “Video Jump” local from the settings in the middle of the screen. There are plenty of functional choices if you wish to use the transition effect that the app will need you to choose from with the color scheme you want. You could also choose to use the default fade in or fade out if you feel this will best serve your first video to the other one.
- Hit “Done” in the very top left corner of your screen.
- The next screen will bring you up a screen where you can save the merged video file on your computer’s local storage space or directly upload it to various cloud storage platforms.
- Also, another feature that I wonder if you would notice is providing a video title. That may be the primary purpose of that criteria.
Hence, this is one of the popular ways to combine videos on iPhones and Macs.


Add Comment