


Microsoft ended support for Exchange 2010 back in October 2020. This means that you won’t get any updates, security fixes, or support from Microsoft. Thus, it is recommended to migrate Exchange 2010 to a newer version, such as Exchange 2019.
However, Exchange 2010 to 2019 Migration upgrade is not easy as you cannot directly migrate an on-premises Exchange 2010 to 2019 directly as both versions use different Active Directory Forest and can’t coexist in the same forest/environment. Therefore, you need to first move your Exchange 2010 to Exchange 2013 or 2016 version and then migrate to Exchange 2019.
In a nutshell,
- You need to first set up an Exchange 2013 or 2016 server
- Then migrate mailboxes from Exchange 2010 to 2013 or 2016
- Decommission the Exchange server 2010
- Set up a new Exchange 2019 server
- Then migrate data and mailboxes from Exchange 2013 or 2016 to Exchange 2019
- Finally, decommission the Exchange server 2013 or 2016.
Steps for Exchange 2010 to 2019 Migration
Following are the steps to migrate Exchange 2010 to 2019.
Step 1: Upgrade System to Exchange 2010 SP3 and SP3 Update Rollup 11
To check the current Exchange version, open Exchange Management Shell (EMS) and enter the following command,
Get-ExchangeServer | Format-List Name, Edition, AdminDisplayVersion
To update your Exchange server, download Microsoft Exchange 2010 SP3 setup and install it on your Exchange 2010 server.
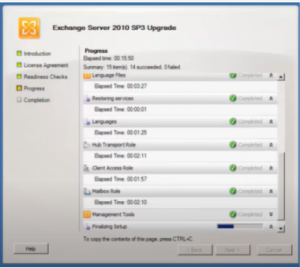
Then download the SP3 Rollup 11 update and install it.
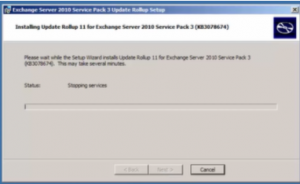
This is critical for Exchange 2010 and Exchange 2013/2016 coexistence.
Step 2: Update Directory Service and Outlook Client
For Exchange 2016, you must update Outlook client to 2010 or above on Windows and Outlook 2011 or above on Mac. Also, update to AD functional level 2008.
Step 3: Install and Setup Exchange 2016 Server
Now you need to install and set up Exchange 2016. Extract the Exchange setup files in a folder and then open Command Prompt as administrator. Navigate to the directory where you extracted the Exchange setup files and then follow these steps:
- Install Active Directory (AD)
Run the following command to prepare the schema:
setup.exe /PrepareSchema /IAcceptExchangeServerLicenseTerms
After the schema is prepared, run the following command to prepare AD:
setup.exe /PrepareAD /IAcceptExchangeServerLicenseTerms
Now prepare your domain using the following command:
setup.exe /PrepareDomain /IAcceptExchangeServerLicenseTerms
This completes the AD installation. Now, you can proceed with Exchange 2016 installation.
- Install Exchange 2016
To install Exchange 2016, open the directory where you extracted the setup files and then run the Setup.exe file. Choose ‘Mailbox role’ during installation.
After installation, click ‘Finish.’ A new browser window will open and load the Exchange Admin Center (EAC). The web-based EAC in Exchange 2016 replaces the Exchange Management Console (EMC) in Exchange 2010.
Step 4: Configure AutoDiscover Service
Execute the following command in Exchange Management Shell to update the Service Connection Point for AutoDiscover.
Set-ClientAccessService -Identity E2016 -AutodiscoverServiceInternalURI https://<SMTP-address-domain>/autodiscover/autodiscover.xml
Step 5: Update Outlook Anywhere Settings via EAC
Open EAC and click on Servers. Select the Exchange 2016 server and then click the Edit icon. From the options, choose Outlook Anywhere option and then update the IMAP4 and DNS lookup settings with your server’s name.
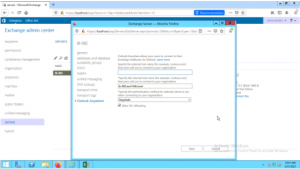
Then use the iisreset command to restart the Internet Information Services (IIS).
Step 6: Rename and Move Default Database
By default, a database is created in Exchange 2016. The database resides in the C: drive. You can rename the database and then move it to a network drive or a different volume. The commands are as follows:
Get-MailboxDatabase -Server <Server> | Set-MailboxDatabase -Name EXCHB01
Move-DatabasePath -Identity EXCHDB01 -EdbFilePath E:\Databases\EXCHDB01\EXCHDB01.EDB -LogFolderPath E:\Databases\EXCHDB01_Log
The command output asks for confirmation. When allowed, it moves the database and logs files to the mentioned path.
Step 7: Configure Exchange URLs
Copy the below script and run it in Exchange Management Shell. This ensures that all URLs are routed via Exchange 2016.
$Server = “EnterYourServerName”
$HTTPS_FQDN = “mail.Yourdomain.com”
Get-OWAVirtualDirectory -Server $Server | Set-OWAVirtualDirectory -InternalURL “https://$($HTTPS_FQDN)/owa” -ExternalURL “https://$($HTTPS_FQDN)/owa”
Get-ECPVirtualDirectory -Server $Server | Set-ECPVirtualDirectory -InternalURL “https://$($HTTPS_FQDN)/ecp” -ExternalURL “https://$($HTTPS_FQDN)/ecp”
Get-OABVirtualDirectory -Server $Server | Set-OABVirtualDirectory -InternalURL “https://$($HTTPS_FQDN)/oab” -ExternalURL “https://$($HTTPS_FQDN)/oab”
Get-ActiveSyncVirtualDirectory -Server $Server | Set-ActiveSyncVirtualDirectory -InternalURL “https://$($HTTPS_FQDN)/Microsoft-Server-ActiveSync” -ExternalURL “https://$($HTTPS_FQDN)/Microsoft-Server-ActiveSync”
Get-WebServicesVirtualDirectory -Server $Server | Set-WebServicesVirtualDirectory -InternalURL “https://$($HTTPS_FQDN)/EWS/Exchange.asmx” -ExternalURL “https://$($HTTPS_FQDN)/EWS/Exchange.asmx”
Get-MapiVirtualDirectory -Server $Server | Set-MapiVirtualDirectory -InternalURL “https://$($HTTPS_FQDN)/mapi” -ExternalURL https://$($HTTPS_FQDN)/mapi
Now you can create a test user via EAC and check the server functionality. If everything works as intended, you can migrate the users from Exchange 2010 to Server 2016.
Step 8: Decommission Exchange 2010 Server
At this stage, you can go ahead and decommission the Exchange 2010 server. Before upgrading or deploying Exchange 2016 to Server 2019, you must ensure that there is no Exchange 2010 server in the forest. You cannot install Exchange 2019 until Exchange 2010 is removed from the environment.
Step 9: Update Exchange 2016
Now check your Exchange 2016 server and upgrade the server to the latest cumulative update. Exchange 2016 and 2019 can coexist in the same environment.
Step 10: Setup and Install Exchange 2019 Server
Now that you have decommissioned Exchange 2010 and updated Exchange 2016 to the latest CU update, it’s time to set up and install Exchange 2019 server in the same environment. After installing the Server 2019, you don’t need to extend Schema, forest, or domain as it does for you.
Again, during installation, select ‘Mailbox role’ and proceed with the installation. This can take a while to complete. After the installation, reboot the server.
Now you can enter the product key to activate Exchange 2019 and then restart the ‘Microsoft Exchange Information Store’ service for changes to take effect.
Step 11: Transfer SSL Certificate to Exchange 2019
To transfer certificate from Exchange 2016 to 2019, follow these steps:
In Exchange 2016 EAC:
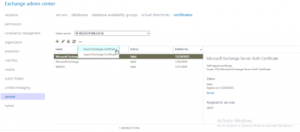
- Navigate to Servers > Certificates and then select the Exchange 2016 server from the drop-down.
- Select the certificate and click three dots.
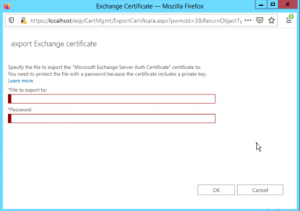
- Choose Export Exchange certificate.
- Enter a UNC path, password, and then click ‘OK.’
In Exchange 2019:
- Open EAC and navigate to Servers > Certificates and then click on three dots.
- Select Import Exchange certificate.
- Enter the UNC path where the certificate was saved, enter the password, and click Next.
- Add the certificate in Exchange 2019 and then click ‘Finish.’
- Now select the imported certificate and click the ‘Edit’ icon.
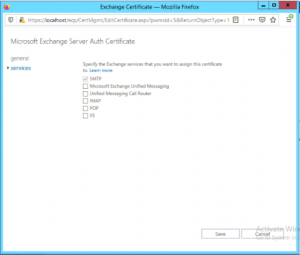
- Click Services and then select the services, such as SMTP and IIS and click ‘Save.’
Step 12: Rename and Move Database
You need to rename the default database and move it from its default C: drive location to a different volume. For this, you can use EAC or execute the following command in the Exchange Management Shell.
Get-MailboxDatabase -Server <Server> | Set-MailboxDatabase -Name EXCHB01
Move-DatabasePath -Identity EXCHDB01 -EdbFilePath E:\Databases\EXCHDB01\EXCHDB01.EDB -LogFolderPath E:\Databases\EXCHDB01_Log
Step 13: Migrate Mailboxes and Public Folders
Finally, you can migrate your Public Folder from Exchange 2016 to 2019 by using the following command:
Get-Mailbox -PublicFolder -Server OLD-SERVER-NAME | New-MoveRequest -TargetDatabase DESTINATION-MAILBOX-DATABASE
Similarly, you can migrate the Exchange mailboxes by using various Exchange Management Shell commands. Although you can also use EAC to migrate mailboxes, it’s not recommended. You can also use an EDB to PST converter software, such as Stellar Converter for EDB, to quickly migrate Public Folders and Mailboxes to the new live Exchange 2019. The software automatically maps the user mailboxes from source to destination. It also provides an option to create New Mailbox, if a mailbox is unavailable during migration. Stellar Converter for EDB extracts mailboxes from offline Exchange database files and saves them to Outlook importable PST format. You can then easily import the PST files into the live Exchange server. It can also export mailboxes directly to the live Exchange server and thus, helps you migrate mailboxes from Exchange 2010 to 2019 Migration without intermediary steps. This can save significant time, effort and helps avoid downtime.
After this, you can go ahead and uninstall/decommission the Exchange 2016 server using the following command.
cd “C:\Program Files\Microsoft\Exchange Server\V15\Bin
setup.exe /mode:uninstall
Optionally, you can keep both servers, if you want, for a while as Exchange 2013/2016 and 2019 can coexist.
Conclusion
Although Exchange 2010 to 2019 Migration upgradation isn’t straightforward, it makes sense to migrate Exchange to the latest available update. The newer version gets regular updates and security patches that keep your data and server safe from malicious attacks and reduces workload. By following this guide, you can migrate from Exchange 2010 to 2019 with ease.
In case you face any error during migration due to corruption in the Exchange database file, you can use an Exchange server database recovery software. The software helps you repair the corrupt EDB file and recover all mailbox items.
In case you need help, you may reach us via the comments section below.


